Oil Seal Failure Checklist
A guide to why your Oil Seal / Rotary Shaft Seal may fail
The below Oil Seal Failure Checklist provides information about seals leakage to those involved in the application and maintenance of Rotary Shaft Seals. Identifying and correcting the cause of leakage will assist the trouble-free, efficient and extended operation.
There are two parts an Oil Seal / Rotary Shaft Seal where leakage can occur:
- The interface between housing bore and seal O.D
- Between the seal lip and shaft
The following Oil Seal Failure Checklist shows the causes of failure and the means of prevention. A poster version can be downloaded here
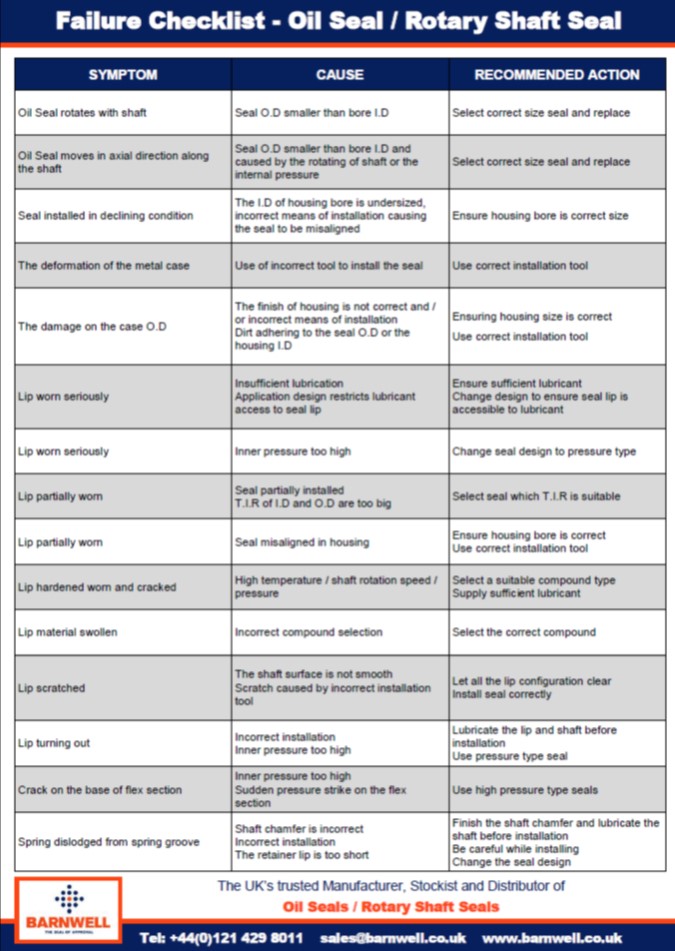
SYMPTOM: Oil Seal rotates with shaft
CAUSE: Seal O.D smaller than bore I.D
RECOMMENDED ACTION: Select correct size seal and replace
SYMPTOM: Oil Seal moves in axial direction along the shaft
CAUSE: Seal O.D smaller than bore I.D and caused by the rotating of shaft or the internal pressure
RECOMMENDED ACTION: Select correct size seal and replace
SYMPTOM: Seal installed in declining condition
CAUSE: The I.D of housing bore is undersized, incorrect means of installation causing the seal to be misaligned
RECOMMENDED ACTION: Ensure housing bore is correct size
SYMPTOM: The deformation of the metal case
CAUSE: Use of incorrect tool to install the seal
RECOMMENDED ACTION: Use correct installation tool
SYMPTOM: The damage on the case O.D
CAUSE: The finish of housing is not correct and / or incorrect means of installation
Dirt adhering to the seal O.D or the housing I.D
RECOMMENDED ACTION: Ensuring housing size is correct
Use correct installation tool
SYMPTOM: Lip worn seriously
CAUSE: Insufficient lubrication
Application design restricts lubricant access to seal lip
RECOMMENDED ACTION: Ensure sufficient lubricant
Change design to ensure seal lip is accessible to lubricant
SYMPTOM: Lip worn seriously
CAUSE: Inner pressure too high
RECOMMENDED ACTION: Change seal design to pressure type
SYMPTOM: Lip partially worn
CAUSE: Seal partially installed
T.I.R of I.D and O.D are too big
RECOMMENDED ACTION: Select seal which T.I.R is suitable
SYMPTOM: Lip partially worn
CAUSE: Seal misaligned in housing
RECOMMENDED ACTION: Ensure housing bore is correct
Use correct installation tool
SYMPTOM: Lip hardened worn and cracked
CAUSE: High temperature / shaft rotation speed / pressure
RECOMMENDED ACTION: Select a suitable compound type
Supply sufficient lubricant
SYMPTOM: Lip material swollen
CAUSE: Incorrect compound selection
RECOMMENDED ACTION: Select the correct compound
SYMPTOM: Lip scratched
CAUSE: The shaft surface is not smooth
Scratch caused by incorrect installation tool
RECOMMENDED ACTION: Let all the lip configuration clear Install seal correctly
SYMPTOM: Lip turning out
CAUSE: Incorrect installation
Inner pressure too high
RECOMMENDED ACTION: Lubricate the lip and shaft before installation
Use pressure type seal
SYMPTOM: Crack on the base of flex section
CAUSE: Inner pressure too high
Sudden pressure strike on the flex section
RECOMMENDED ACTION: Use high-pressure type seals
SYMPTOM: Spring dislodged from spring groove
CAUSE: Shaft chamfer is incorrect
Incorrect installation
The retainer lip is too short
RECOMMENDED ACTION: Finish the shaft chamfer and lubricate the shaft before installation
Be careful while installing
Change the seal design
(Oil-Seals-Failure-Checklist-Poster.pdf)
M Barnwell Service is one of the UK’s most trusted Manufacturer, Stockist and Distributor of Oil Seals / Rotary Shaft Seals. For more information about our range and to talk to an expert contact the team today.
Require more learning? Below are some useful links: